Connect Salesforce to Lensmor
Connect Salesforce to sync Opportunity data into Lensmor, control CRM visibility, and export Lensmor contacts to Salesforce.
Written By joyce
Last updated 15 days ago
Last updated: November 5, 2026
Connect Salesforce to Lensmor to do two things: sync Salesforce Opportunity context into Lensmor so you can prioritize event companies, and export selected or filtered Lensmor contacts to Salesforce. These are separate actions. Connecting an account never exports contacts automatically.
Before you start
A Workspace owner or admin must first connect one Salesforce Organization for the Workspace.
After the Workspace Organization is connected, each Workspace member connects their own Salesforce user from that same Organization.
Your Salesforce user needs API access and permission to read Accounts, Opportunities, and Users, and to create or update Contacts and Accounts. Export also creates the Lensmor custom fields it needs.
Your Lensmor plan must include export access to export contacts to Salesforce.
Hidden contact details remain hidden in an export unless you reveal them first. Revealing contact details is a separate action.
How Salesforce connections work
Lensmor separates the Workspace Salesforce Organization from each member's personal Salesforce connection:
Workspace Organization: The Salesforce Organization approved for the Workspace. Owners and admins can connect or change it.
Personal connection: The Salesforce user authorized by an individual Workspace member. It controls which Opportunities that member can sync and which Lensmor contacts they can export.
The same personal connection works across Lensmor features and Lensmor Agent. Each connection, CRM snapshot, and visibility setting is isolated by Workspace and user. Connecting your account does not expose your Salesforce credentials or private CRM data to every Workspace member.
1. Connect the Workspace Organization (owner or admin)
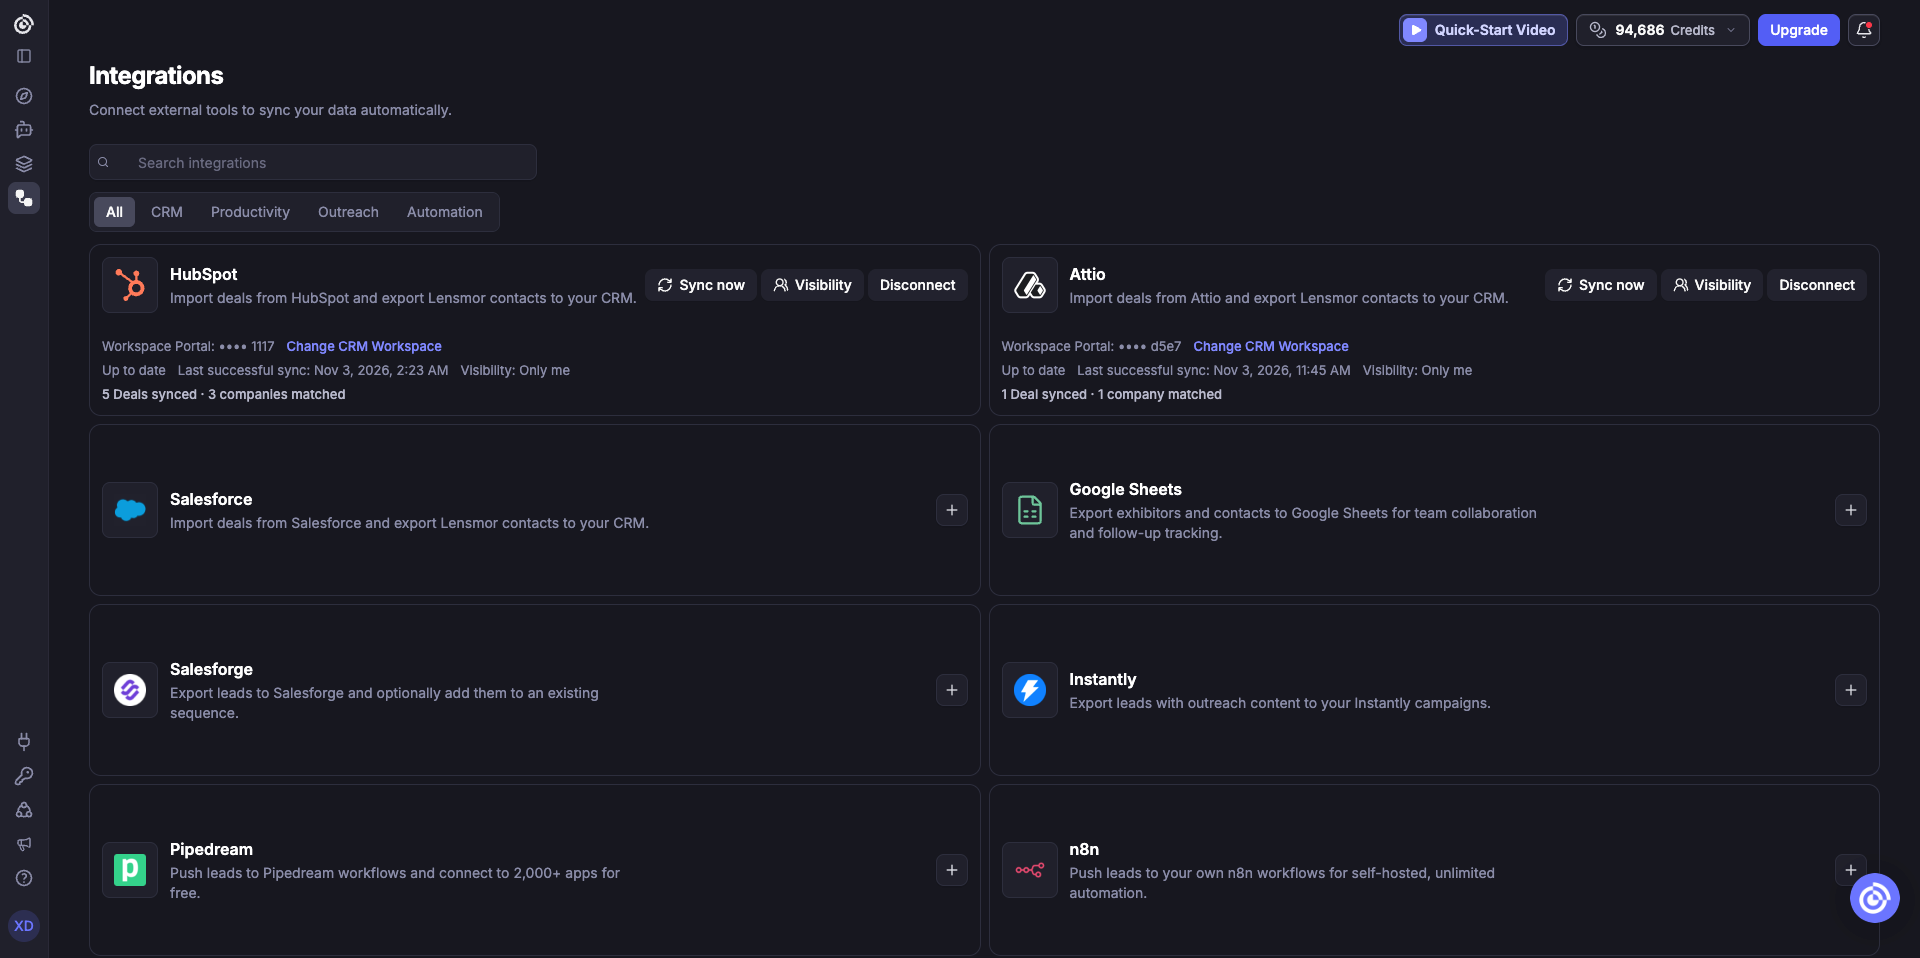
In Lensmor, open Integrations from the dashboard.
Find Salesforce and click Connect.
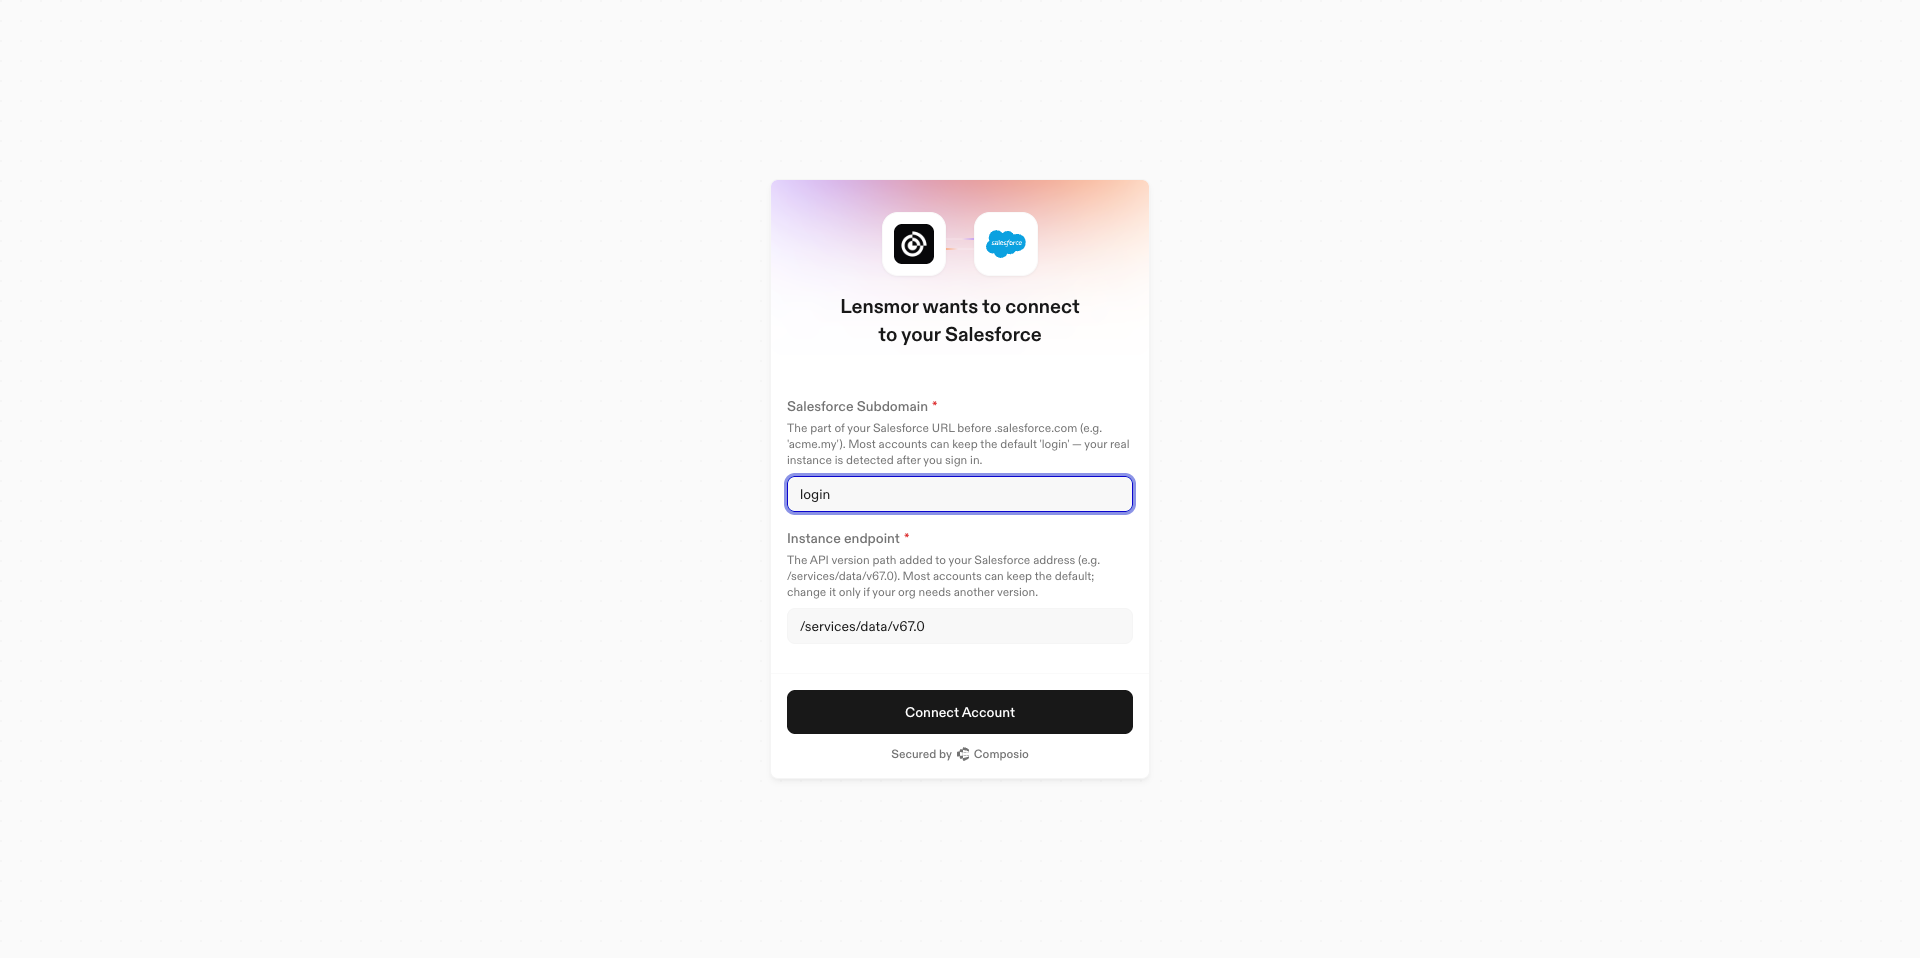
In the Connect Salesforce dialog, click Continue with Salesforce.
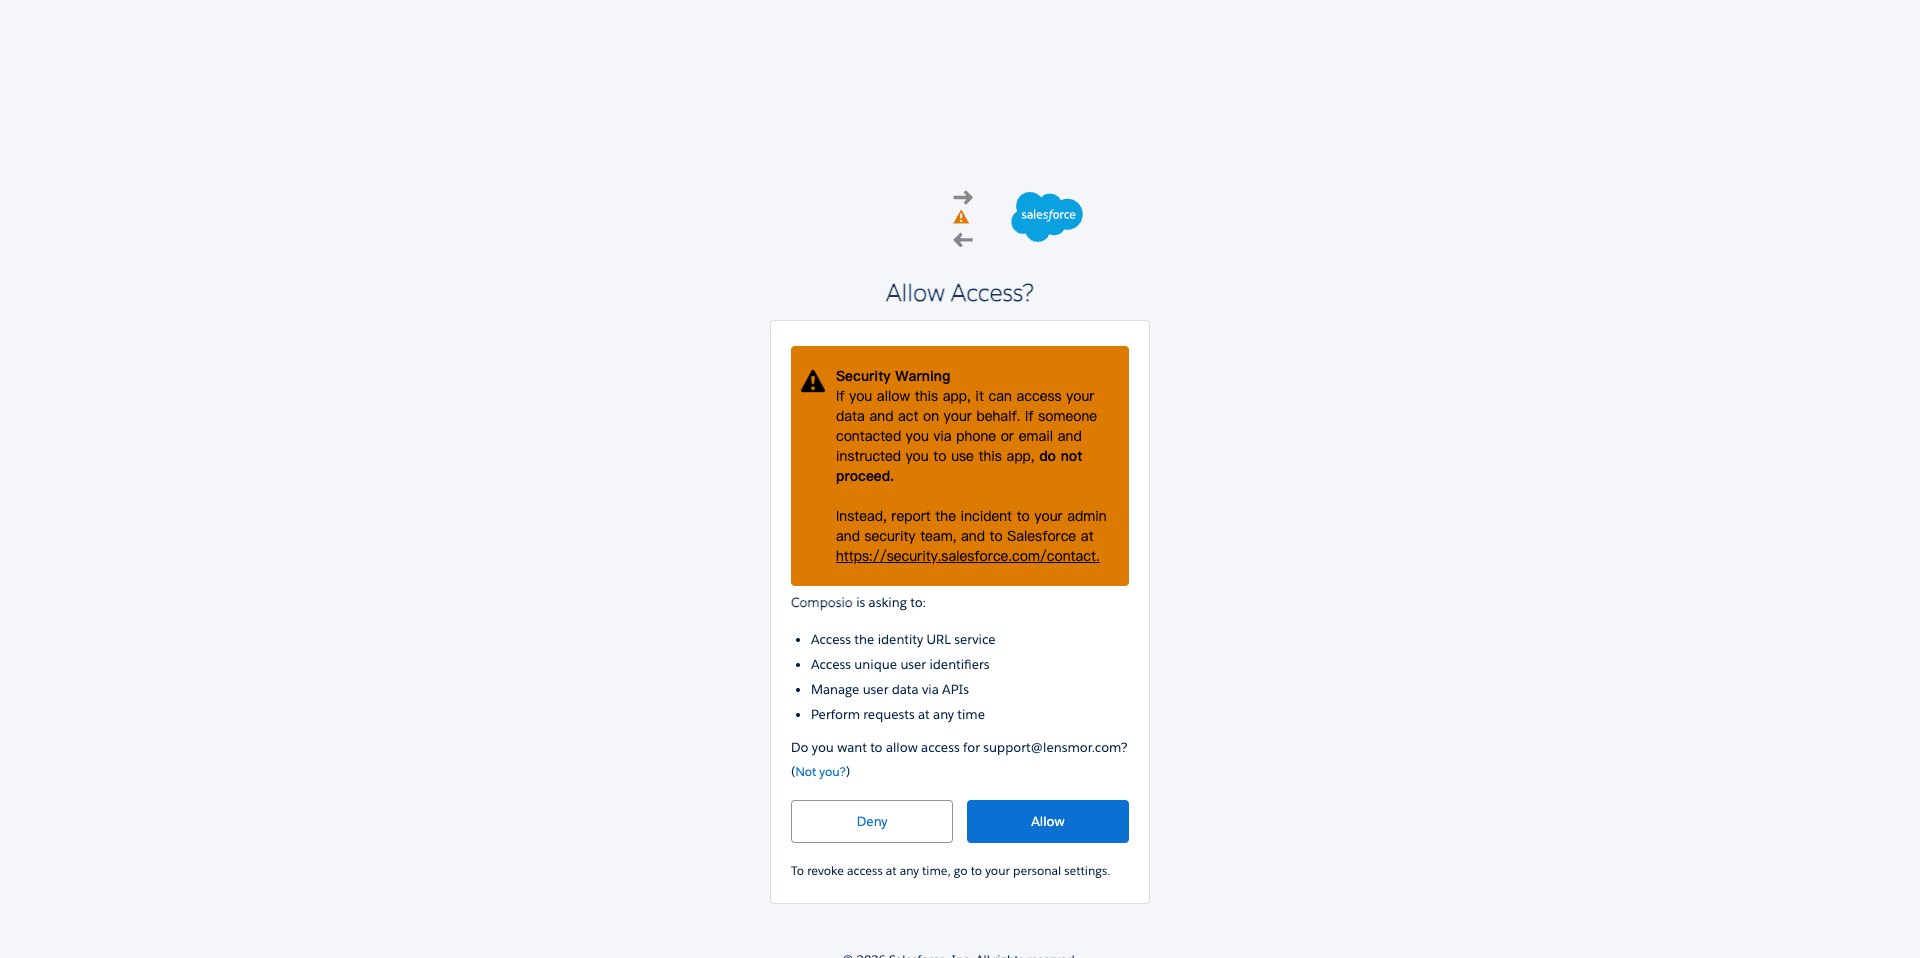
Sign in to the Salesforce Organization your Workspace will use and approve the requested permissions.
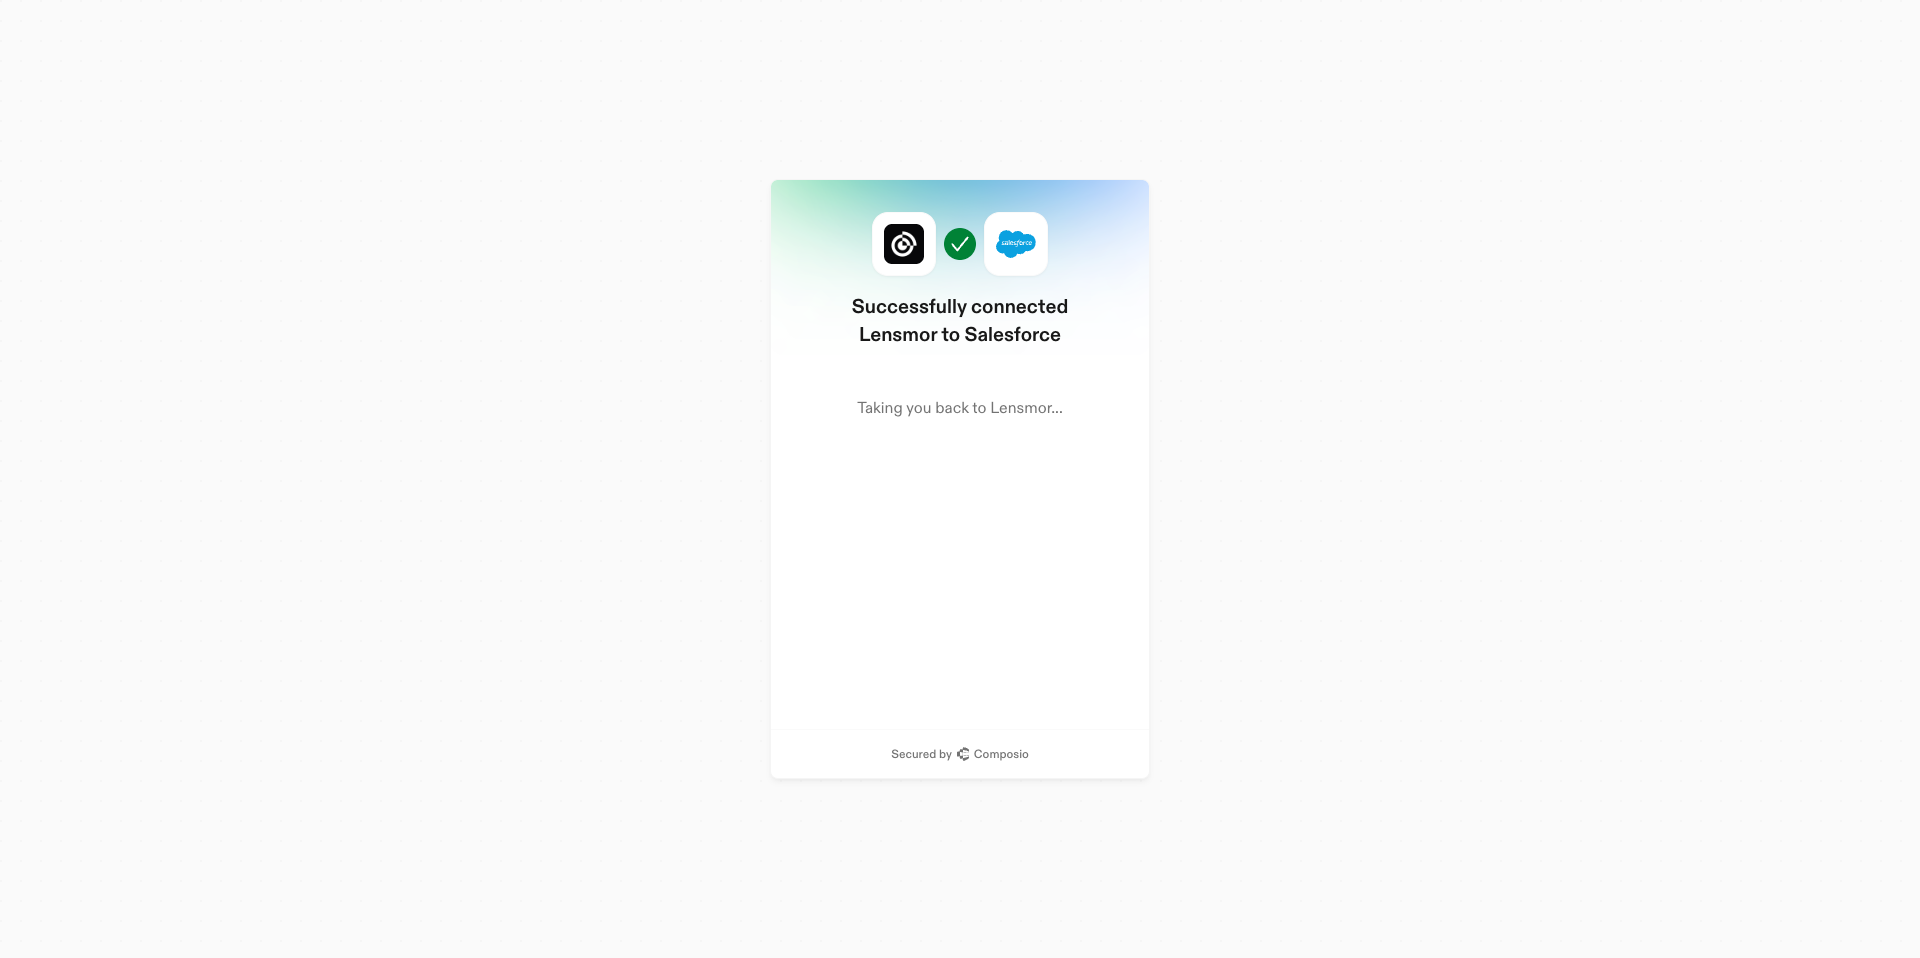
Return to Lensmor and confirm that the Salesforce card says the Workspace is ready.
2. Connect your Salesforce user
Once a Workspace Organization is set, all Workspace members can connect their own Salesforce user.
Open Integrations and click Connect my Salesforce.
Review the Organization shown in Lensmor, then click Continue with Salesforce.
Authorize a Salesforce user from the same Organization.
Return to Lensmor and confirm that the Salesforce card shows Connected.
If you can access more than one Salesforce Organization, select the Organization identified in Lensmor. A connection to a different Organization is rejected so CRM data cannot cross Workspace boundaries.
Control who can see your synced Opportunity data
Your Salesforce Opportunity sync is private by default.
Only me: Only you can see CRM data from your personal connection.
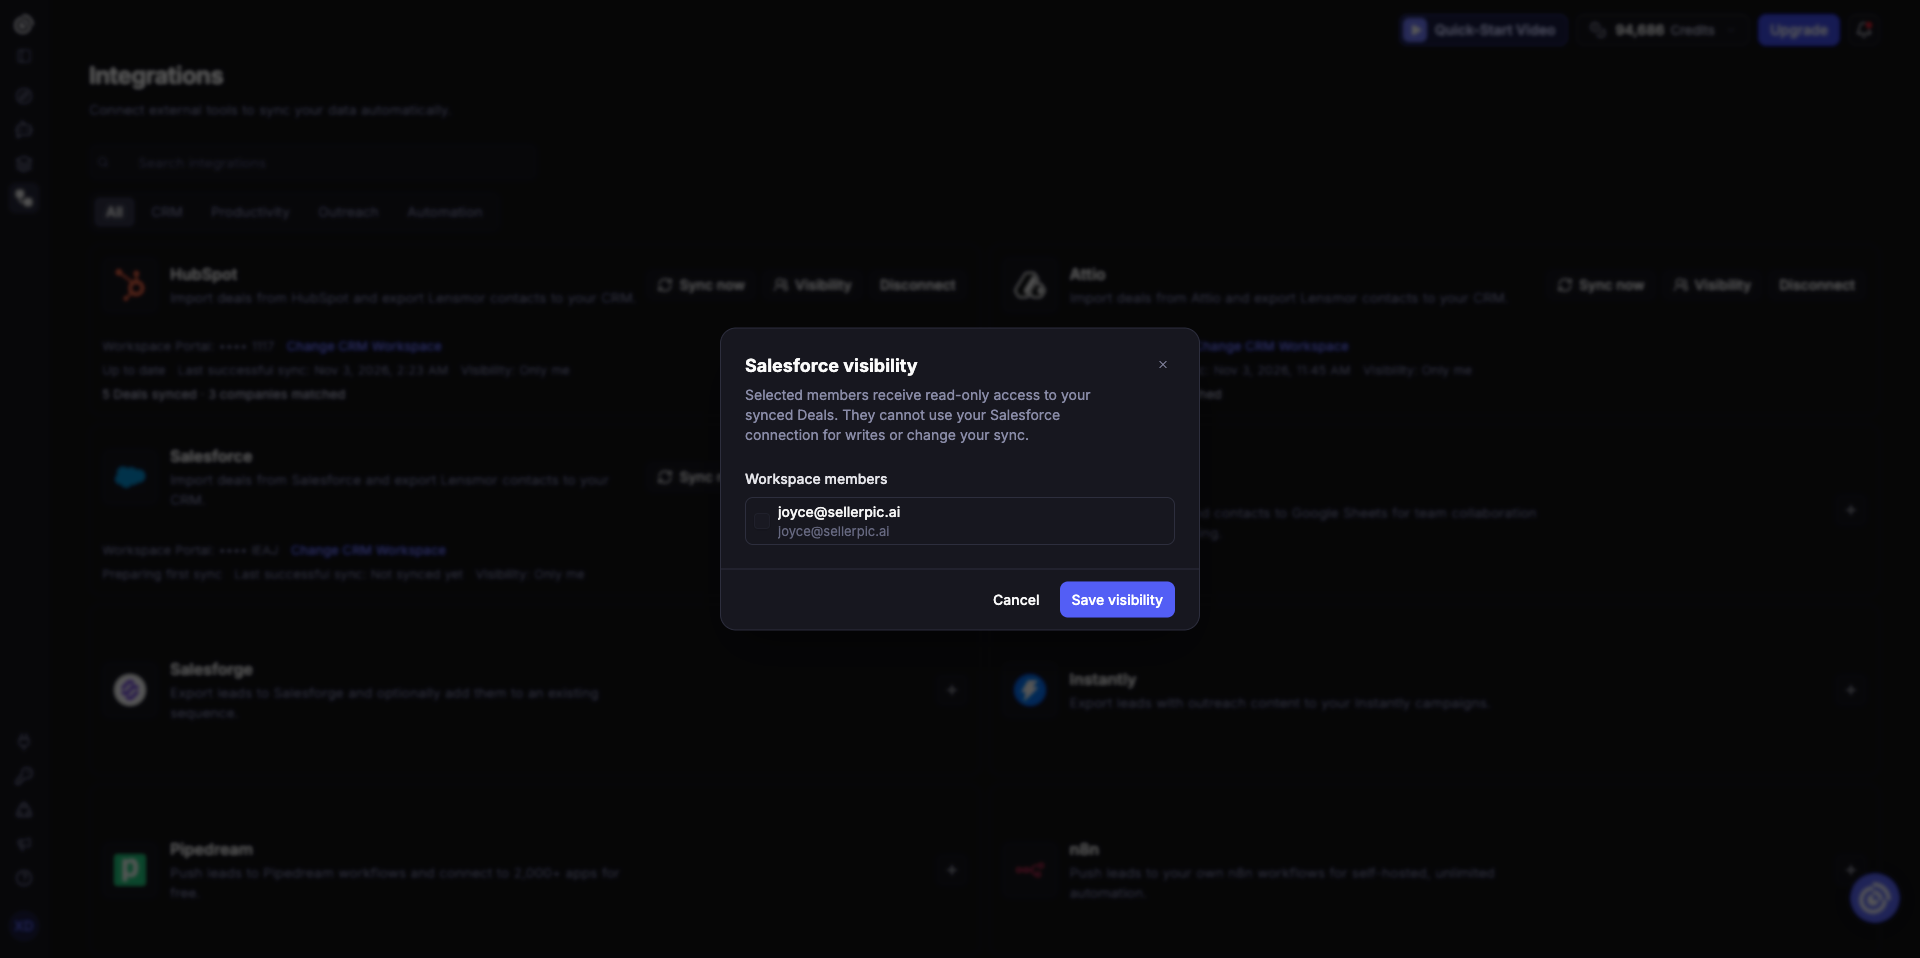
Selected members: Use Visibility to share your synced snapshot with specific Workspace members.
Members you share with receive read-only access. They cannot sync, disconnect, export through, or change the visibility of your Salesforce source.
Sharing CRM data does not share your Salesforce sign-in or credentials.
Sync Opportunities into Lensmor
After your personal connection succeeds, Lensmor starts an initial sync. Use Sync now whenever you want to refresh the snapshot after changes in Salesforce.
During sync, Lensmor reads the Opportunities available to your authorized Salesforce user and resolves their Stage, Owner, Amount, Currency, and associated Account. Lensmor stores a read-only snapshot and does not edit Salesforce Opportunities.
The Salesforce card can show:
Preparing first sync: Lensmor is preparing your first Salesforce snapshot.
Sync in progress: Lensmor is processing Salesforce data.
Up to date: The latest sync completed successfully.
Showing the last successful sync: A newer refresh did not complete, so Lensmor kept your last successful snapshot.
Sync needs attention: The latest sync failed and may require reconnecting.
After a successful sync, the card shows N Deals synced · M companies matched. In Lensmor, Salesforce Opportunities use the common CRM label “Deals.” The summary includes your own source plus sources shared with you; it is not a count of events.
Company matching requirements
Lensmor maps Salesforce CRM data to event companies by domain. For an Opportunity to appear in Lensmor:
The Opportunity must be associated with an Account.
The Salesforce Account should have a valid Website.
That website domain must match a company domain in Lensmor after normalization.
If an Opportunity is missing, open it in Salesforce and verify its Account association and the Account Website, then return to Lensmor and click Sync now.
View and filter Salesforce data in an event
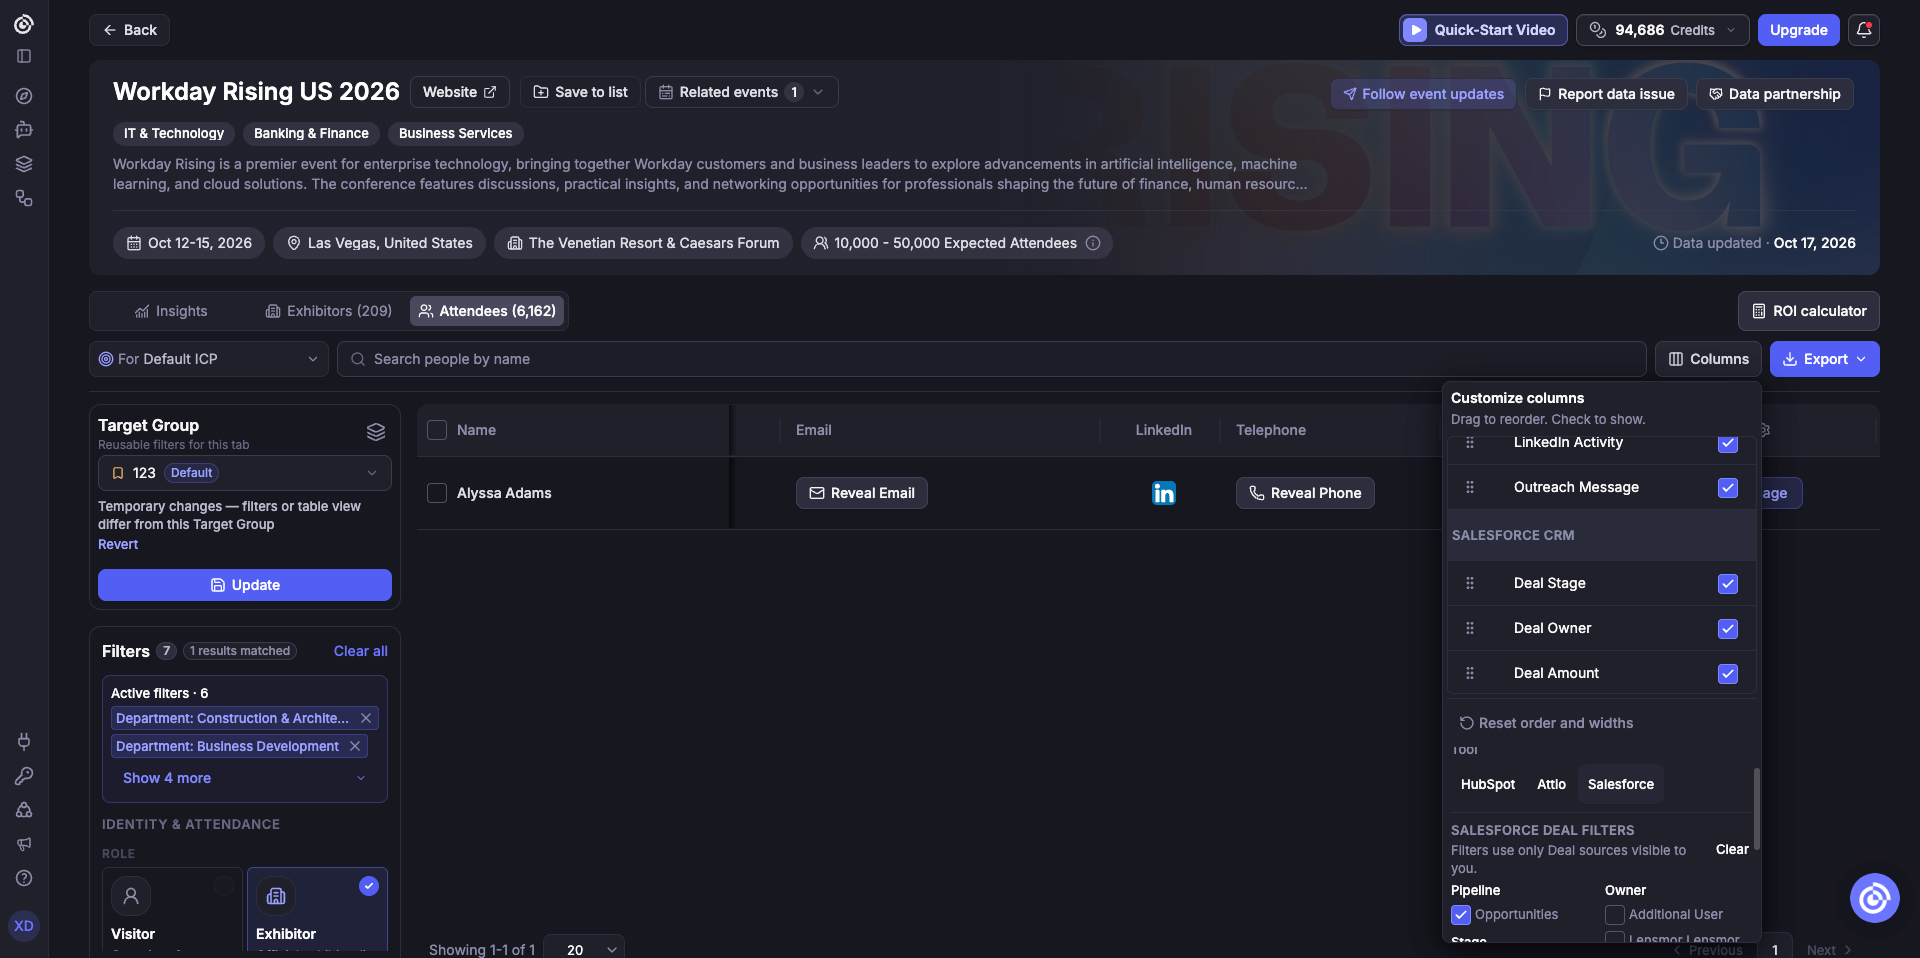
Open an event and go to Exhibitors or Attendees. Choose Salesforce as the CRM data source. When visible CRM data matches companies at that event, you can add these columns:
Deal Stage
Deal Owner
Deal Amount
Open Columns to filter Salesforce data by:
Opportunity
Stage
Owner
Minimum and maximum Deal Amount
The CRM columns and filters use only your own Salesforce source and sources shared with you. If none of those sources has an Account domain matched in Lensmor, the CRM controls stay hidden.
Use Salesforce data in Event Insights
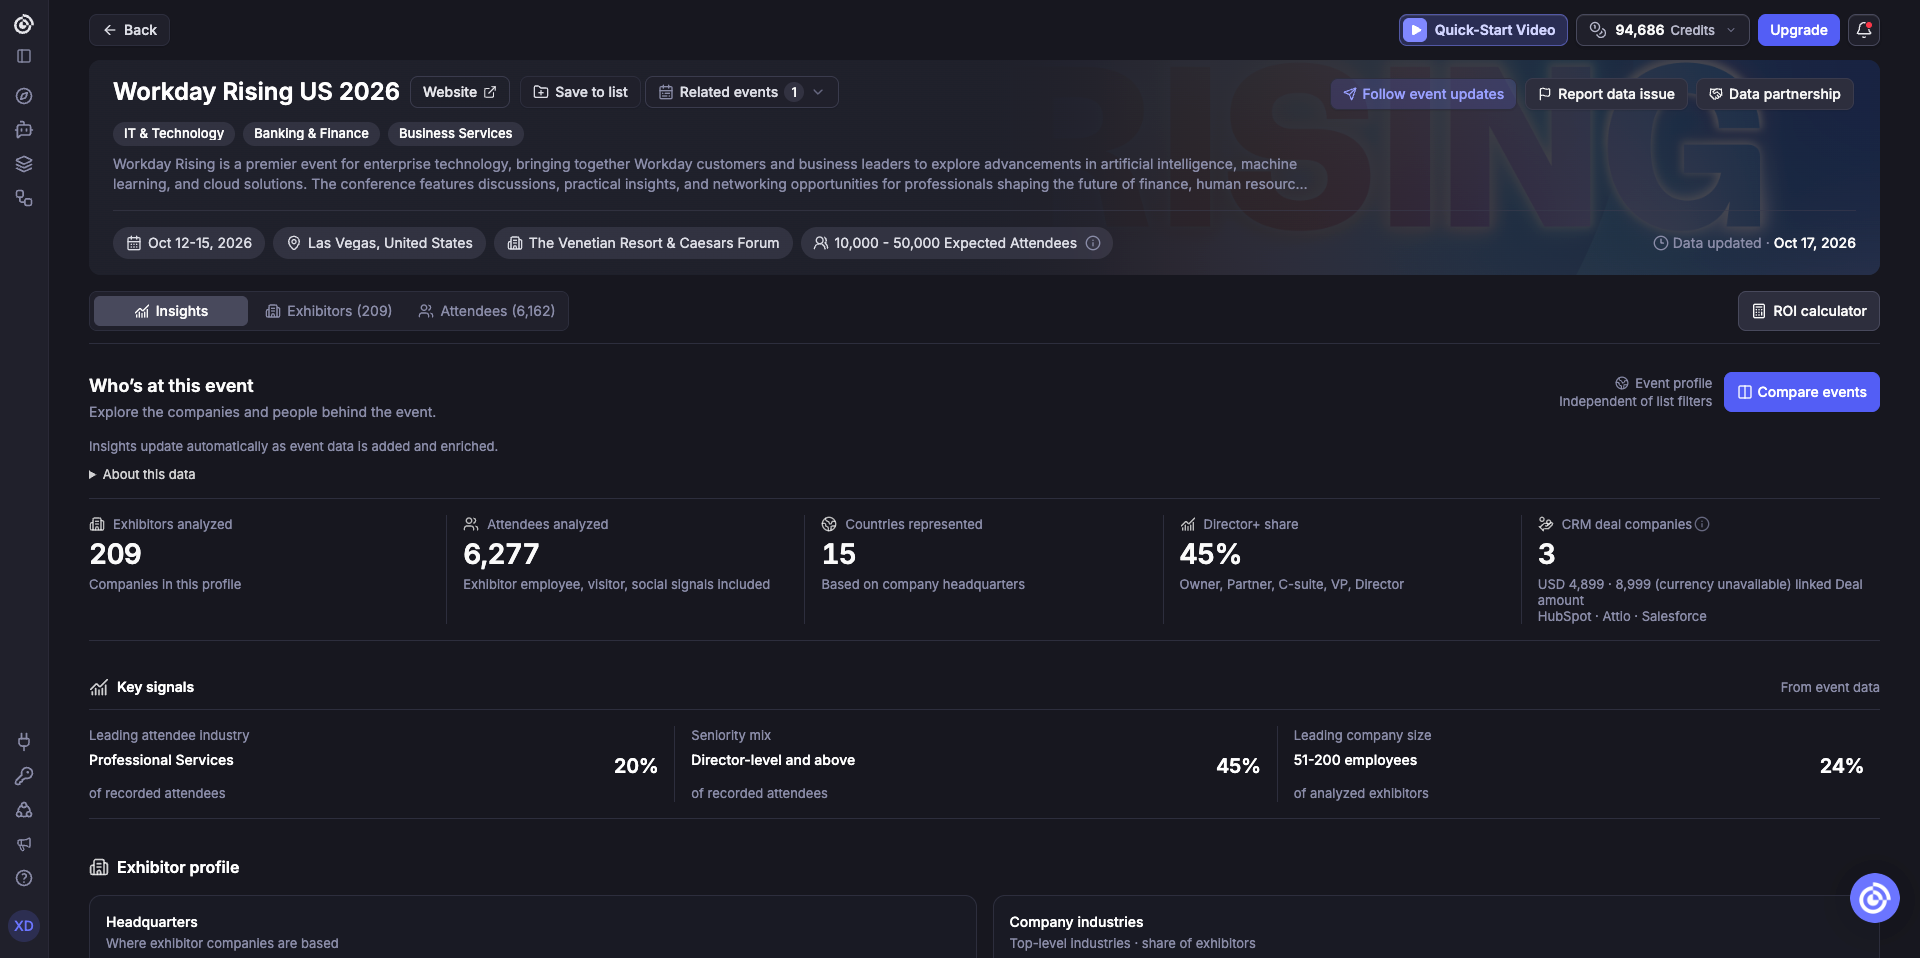
In an event's Insights tab, CRM deal companies shows how many event companies are associated with CRM records visible to you, together with Deal amounts grouped by currency. Salesforce Opportunities are included alongside any other CRM sources visible to you, with matching companies deduplicated.
Export Lensmor contacts to Salesforce
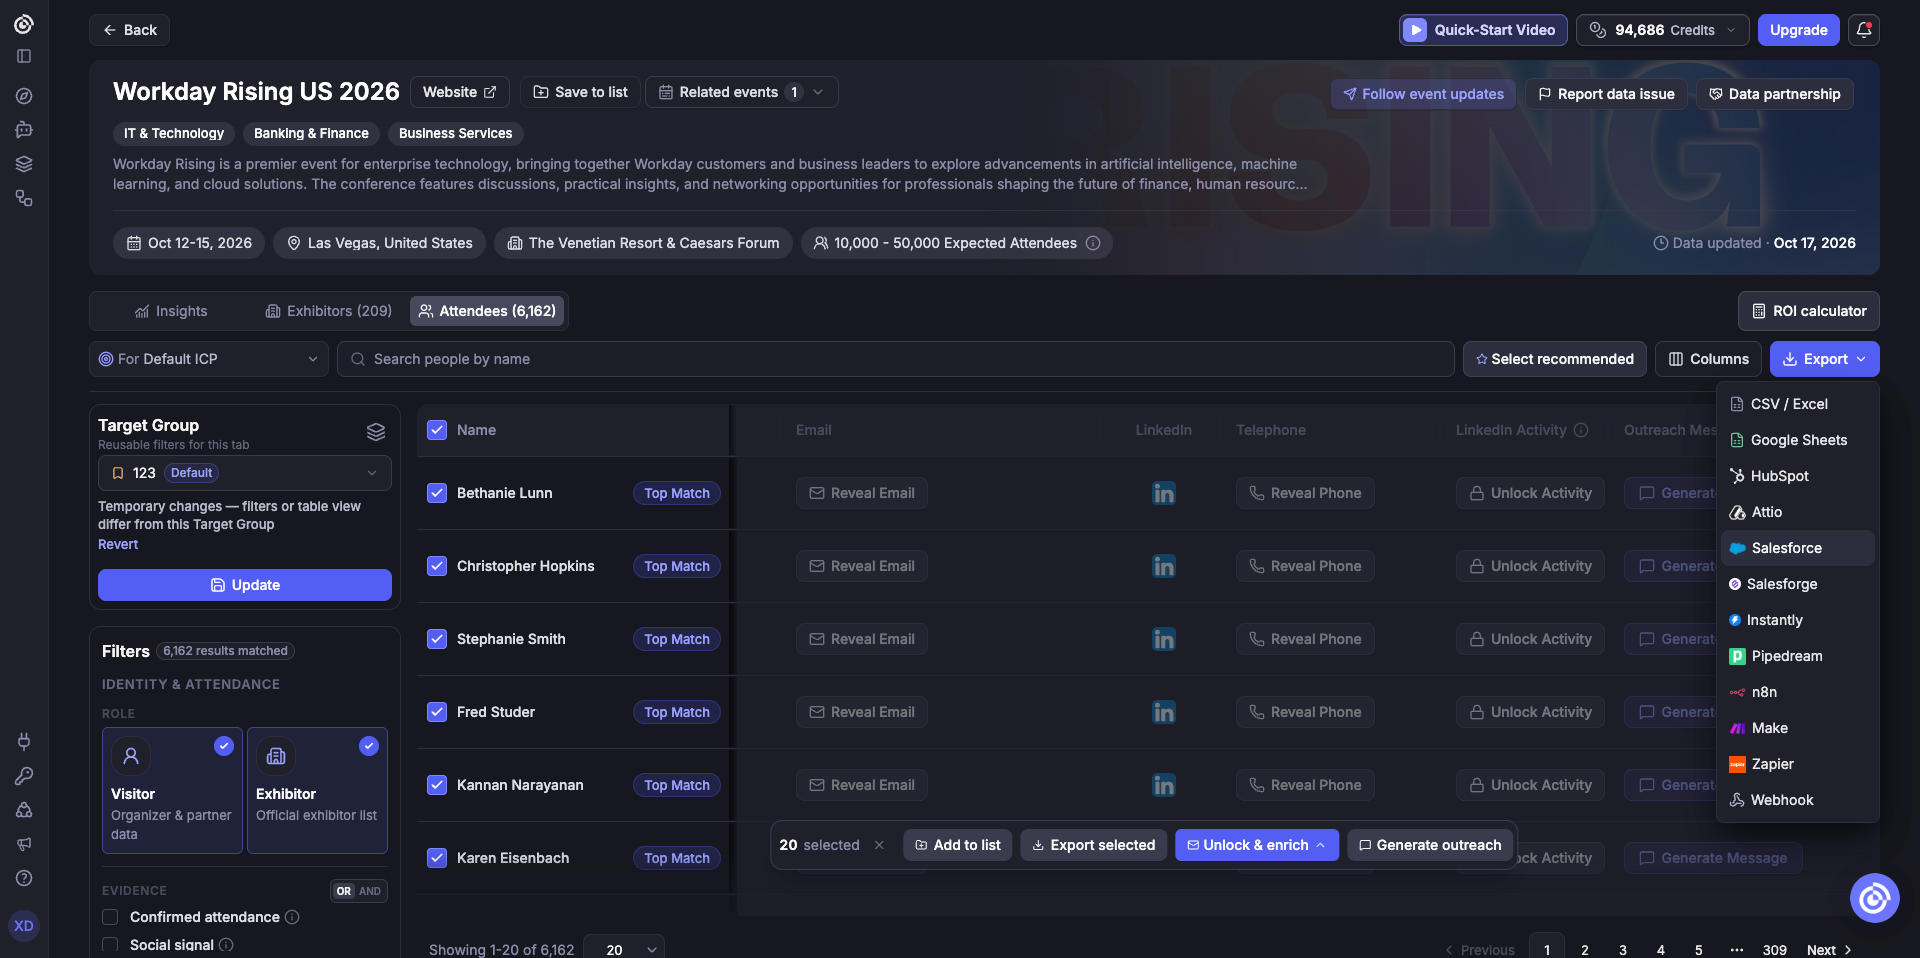
Opportunity sync brings Salesforce context into Lensmor. Export sends selected Lensmor contacts to Salesforce. Export only starts when you confirm it.
Open an event and go to Attendees.
Select contacts or apply filters to define the group you want to export.
Open Export and choose Salesforce.
In Export to Salesforce, choose Selected Items or All Filtered Data.
Optionally enable Skip previously exported to exclude contacts already exported from any event in this Workspace.
Review the count and click Export.
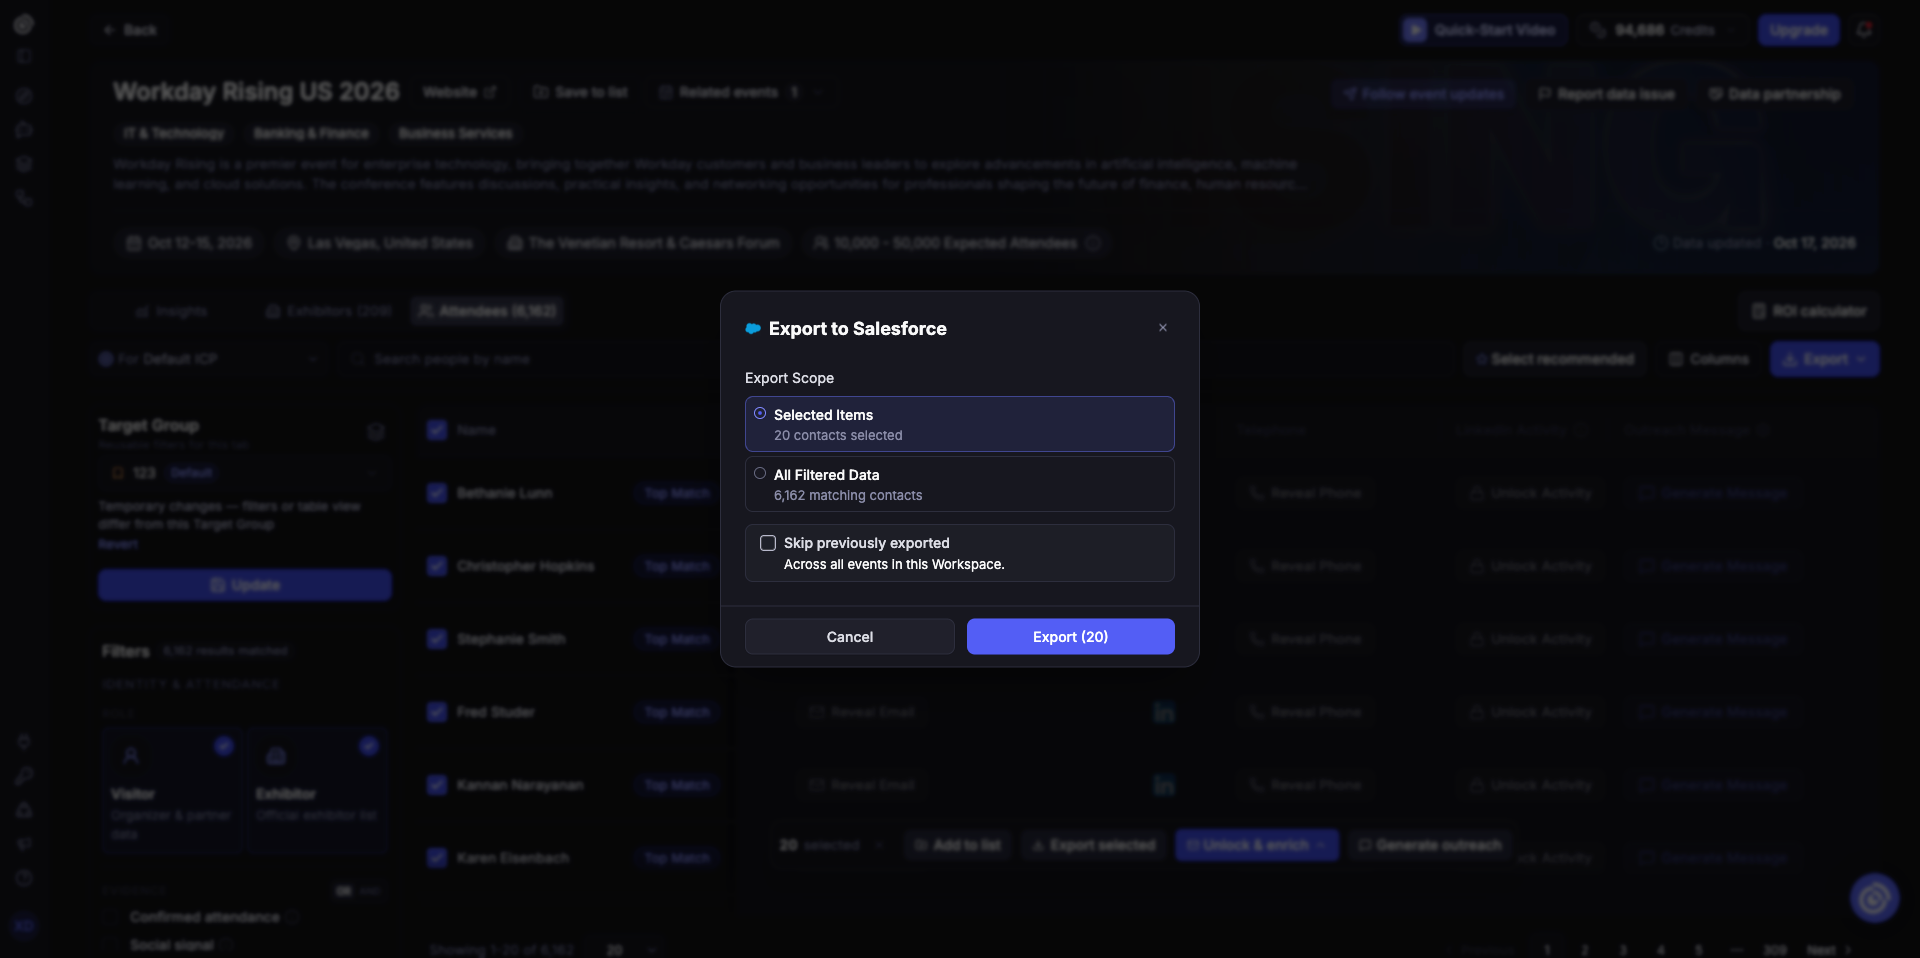
Salesforce export supports up to 1,000 contacts at a time. If your selection or filtered result is larger, Lensmor exports the first 1,000; narrow the group or export in batches to include the rest.
Lensmor creates or updates Contacts and their associated Accounts, adds Lensmor-specific fields for event and company context, and preserves existing CRM-authored notes. If more than one Salesforce Contact has the same email address, Lensmor does not guess which record to update; that contact's export fails until the duplicate is resolved.
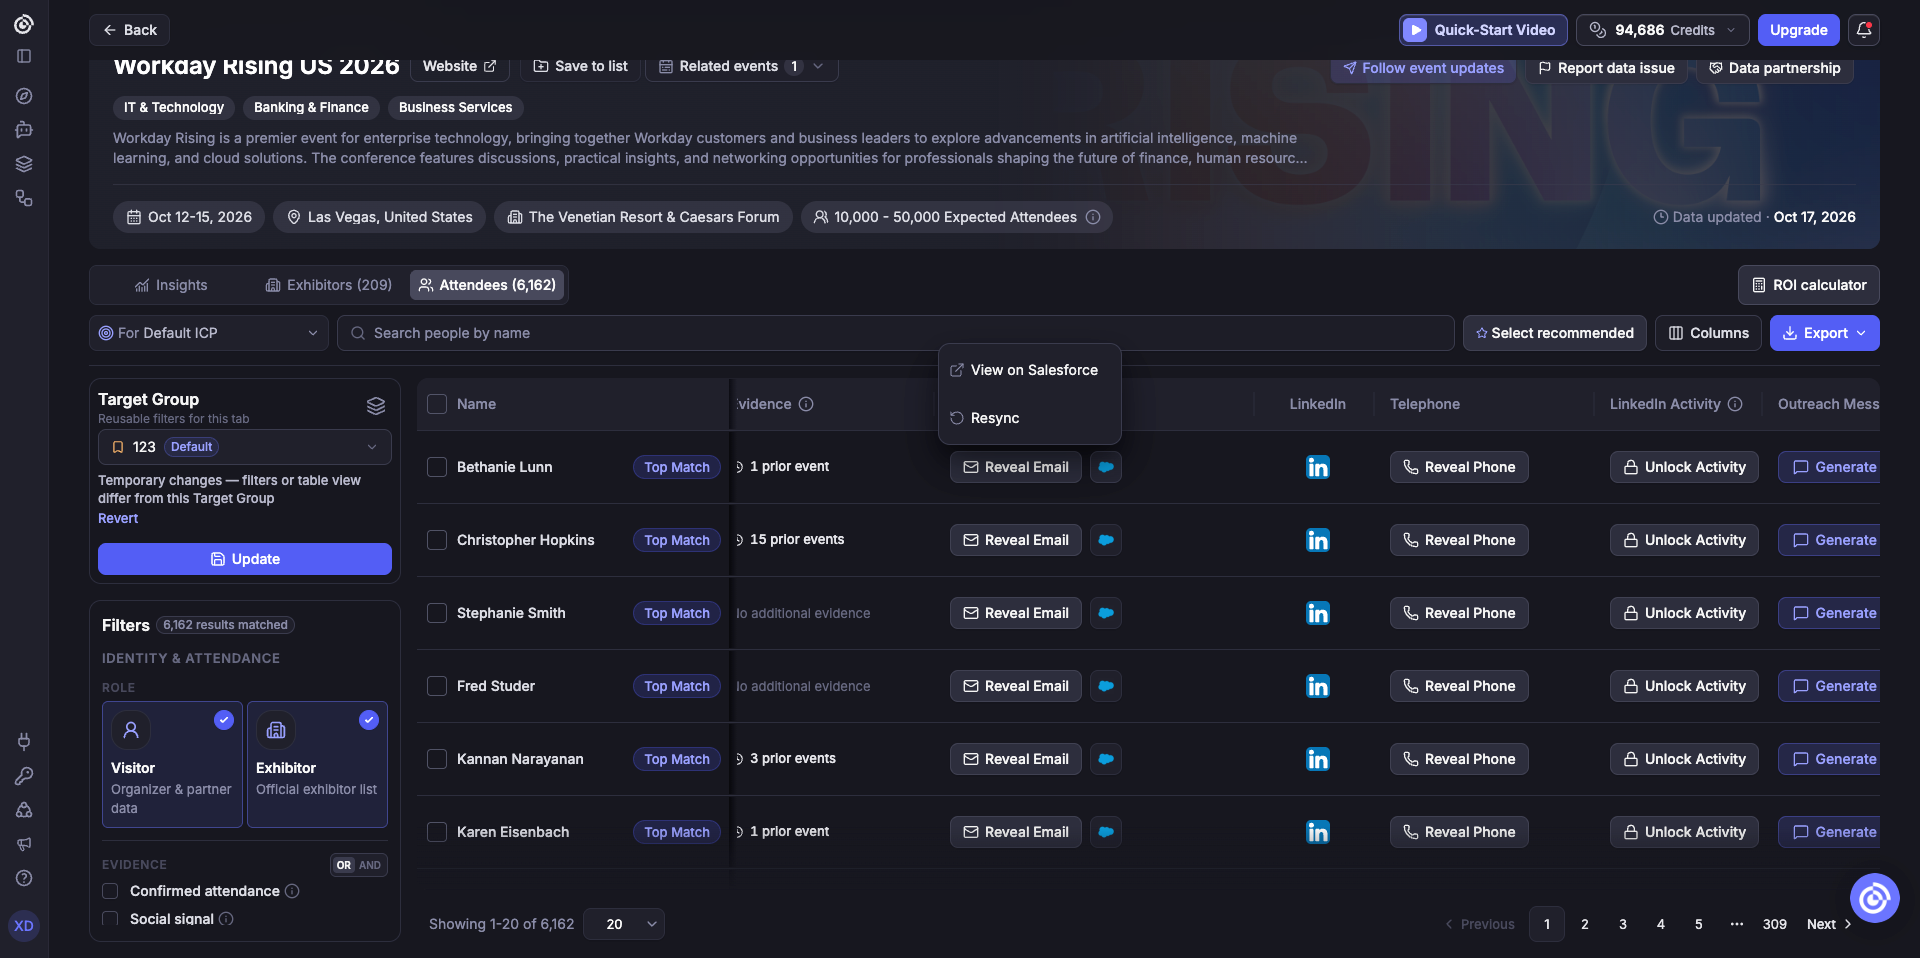
Show exported fields on Salesforce records
Lensmor creates its custom fields on Salesforce Contacts and Accounts during export. Creating a field does not automatically place it on a record page. Until an admin adds it to the page layout, the field can exist and hold data without appearing in the Details tab.
In Salesforce, open Setup → Object Manager → Contact → Fields & Relationships and search for Lensmor to confirm the Contact fields exist.
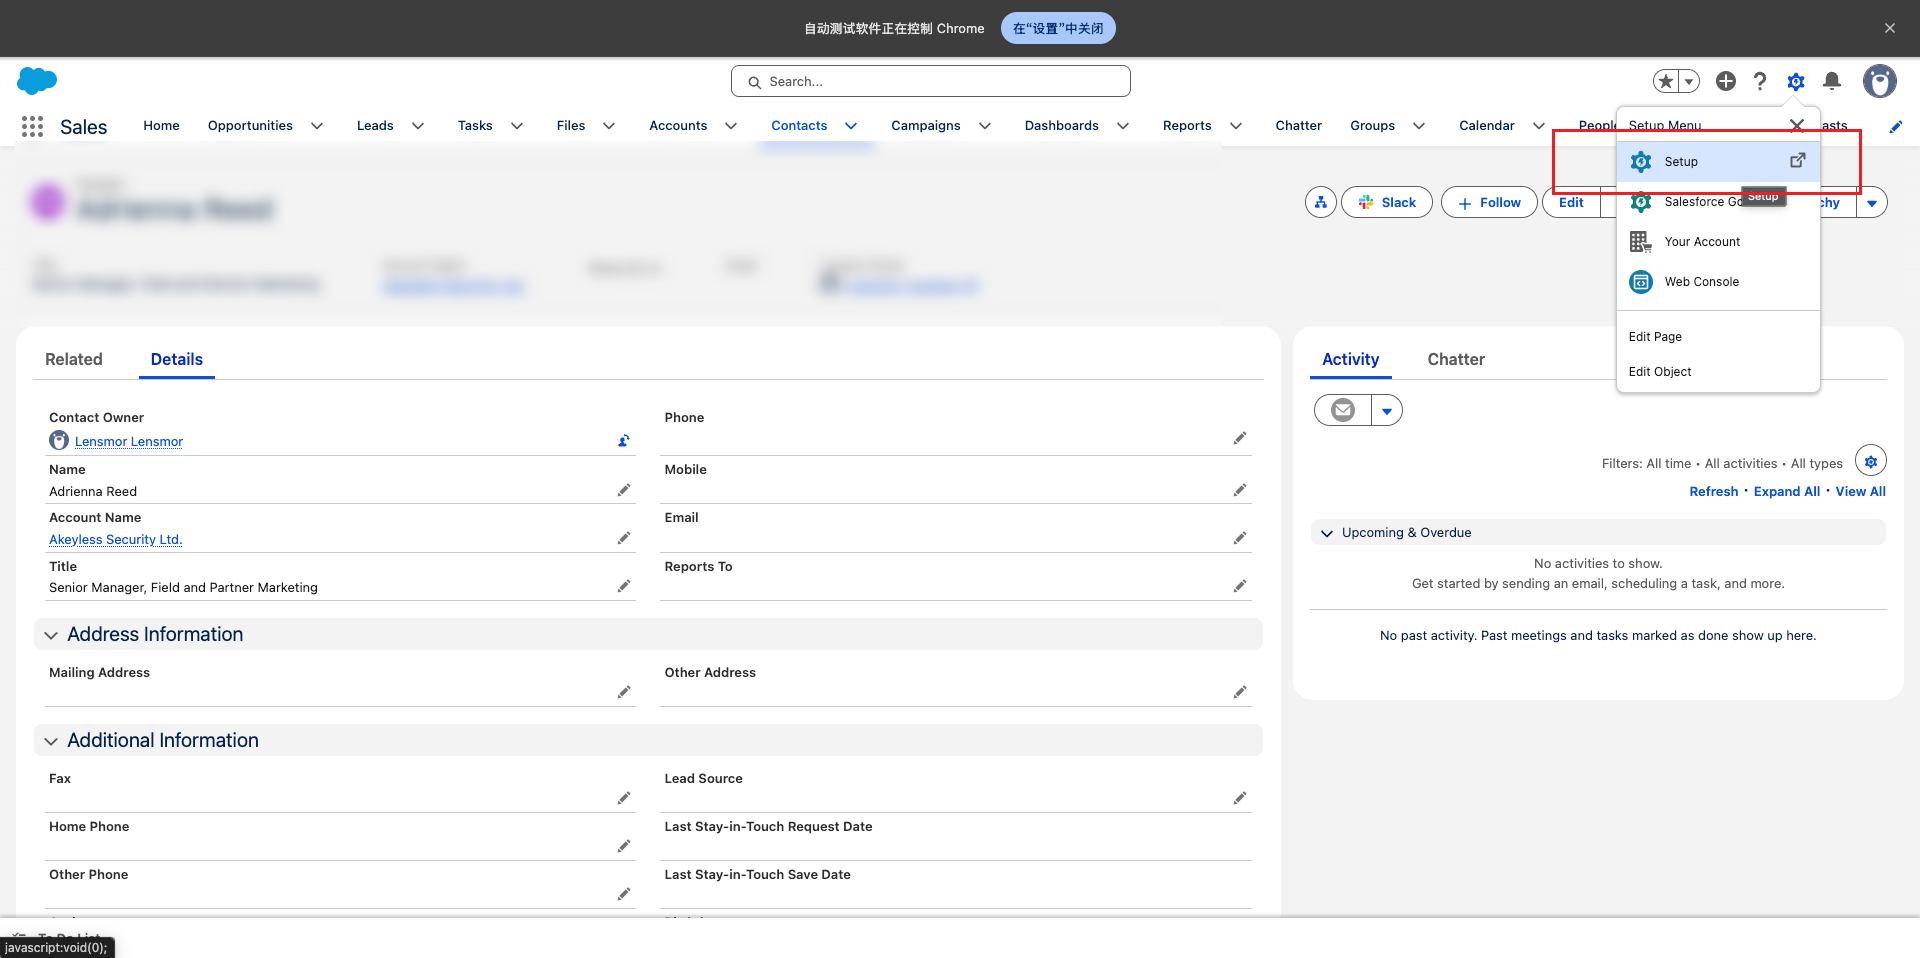
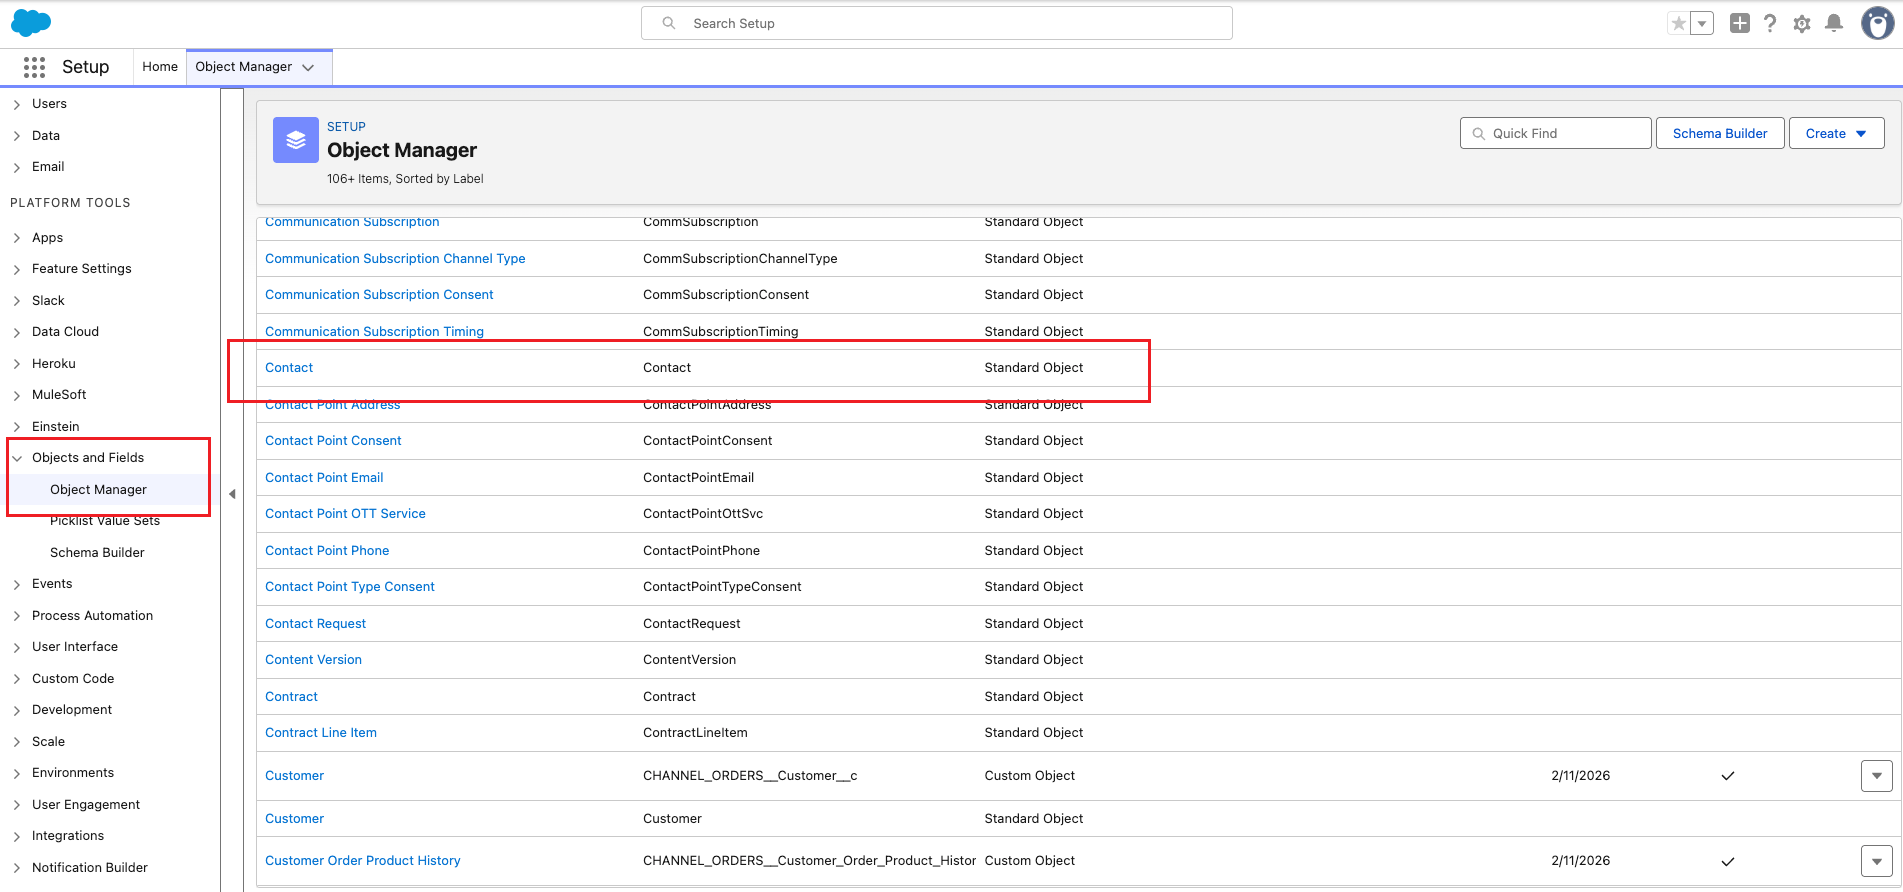
Open Contact → Page Layouts and edit the layout assigned to the people who need to see the data. In the Fields palette, drag the Lensmor fields into a visible section, such as Contact Information, or create a Lensmor section. Save the layout.
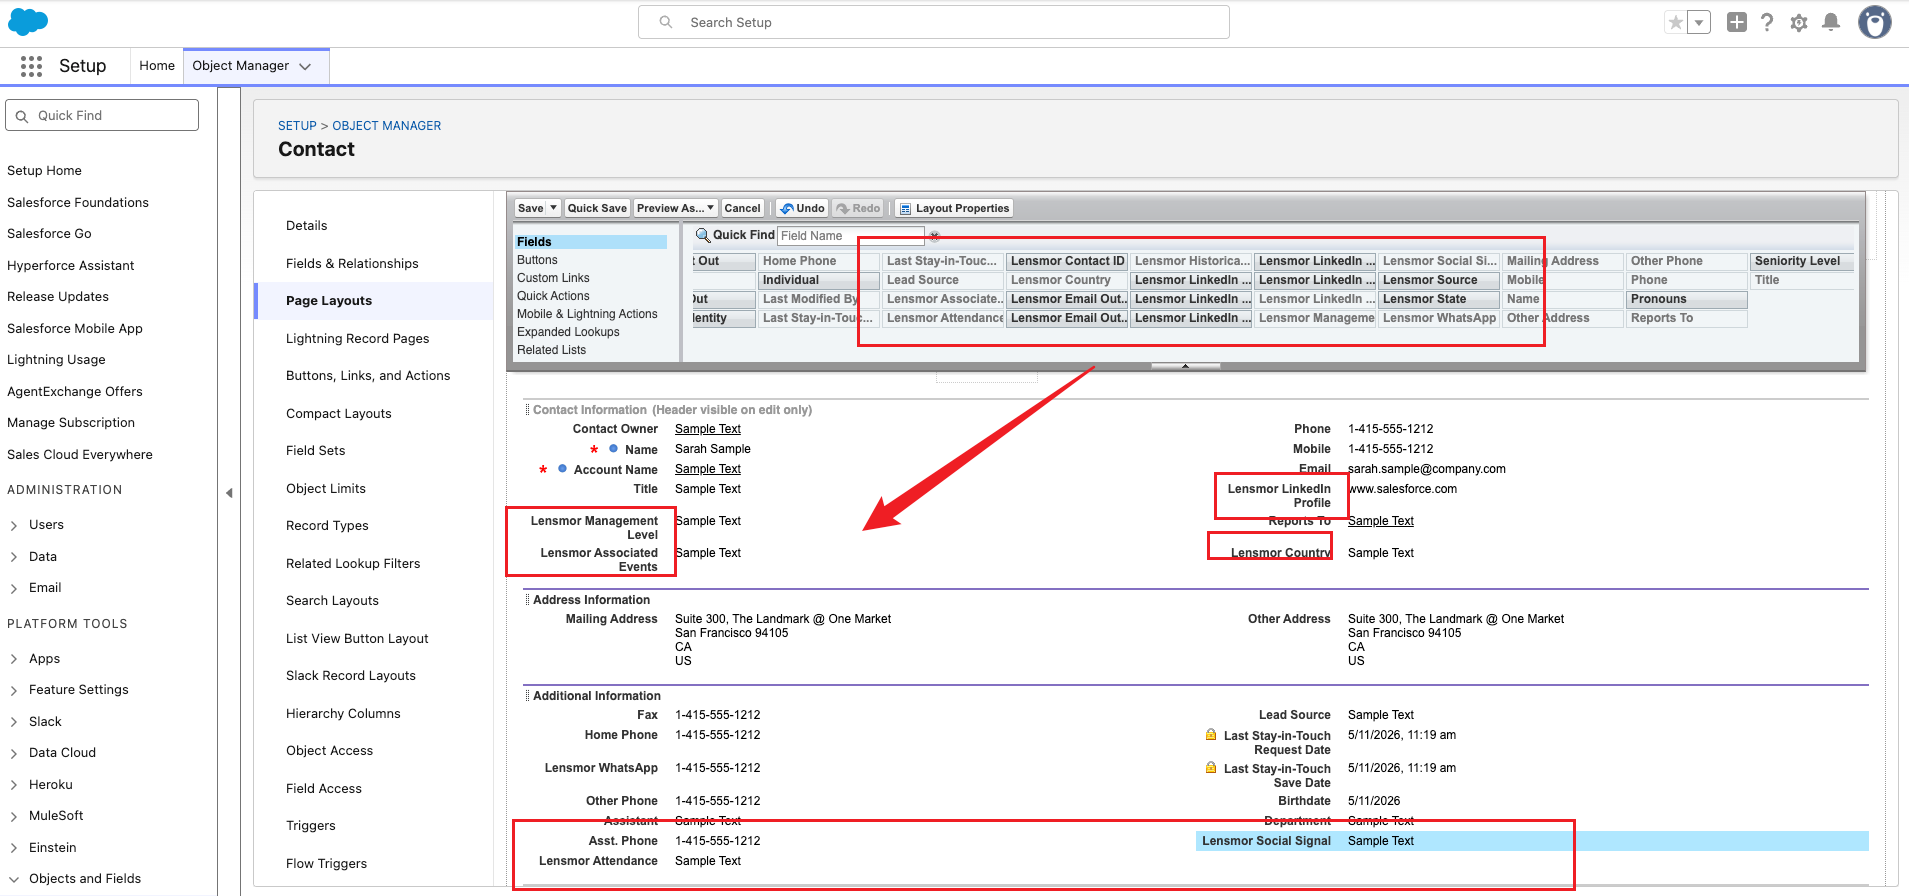
Refresh a Salesforce Contact record and open Details. To show company fields such as Lensmor Company Industry or Employee Count Range, repeat the layout steps under Object Manager → Account → Page Layouts, then open the linked Account record.
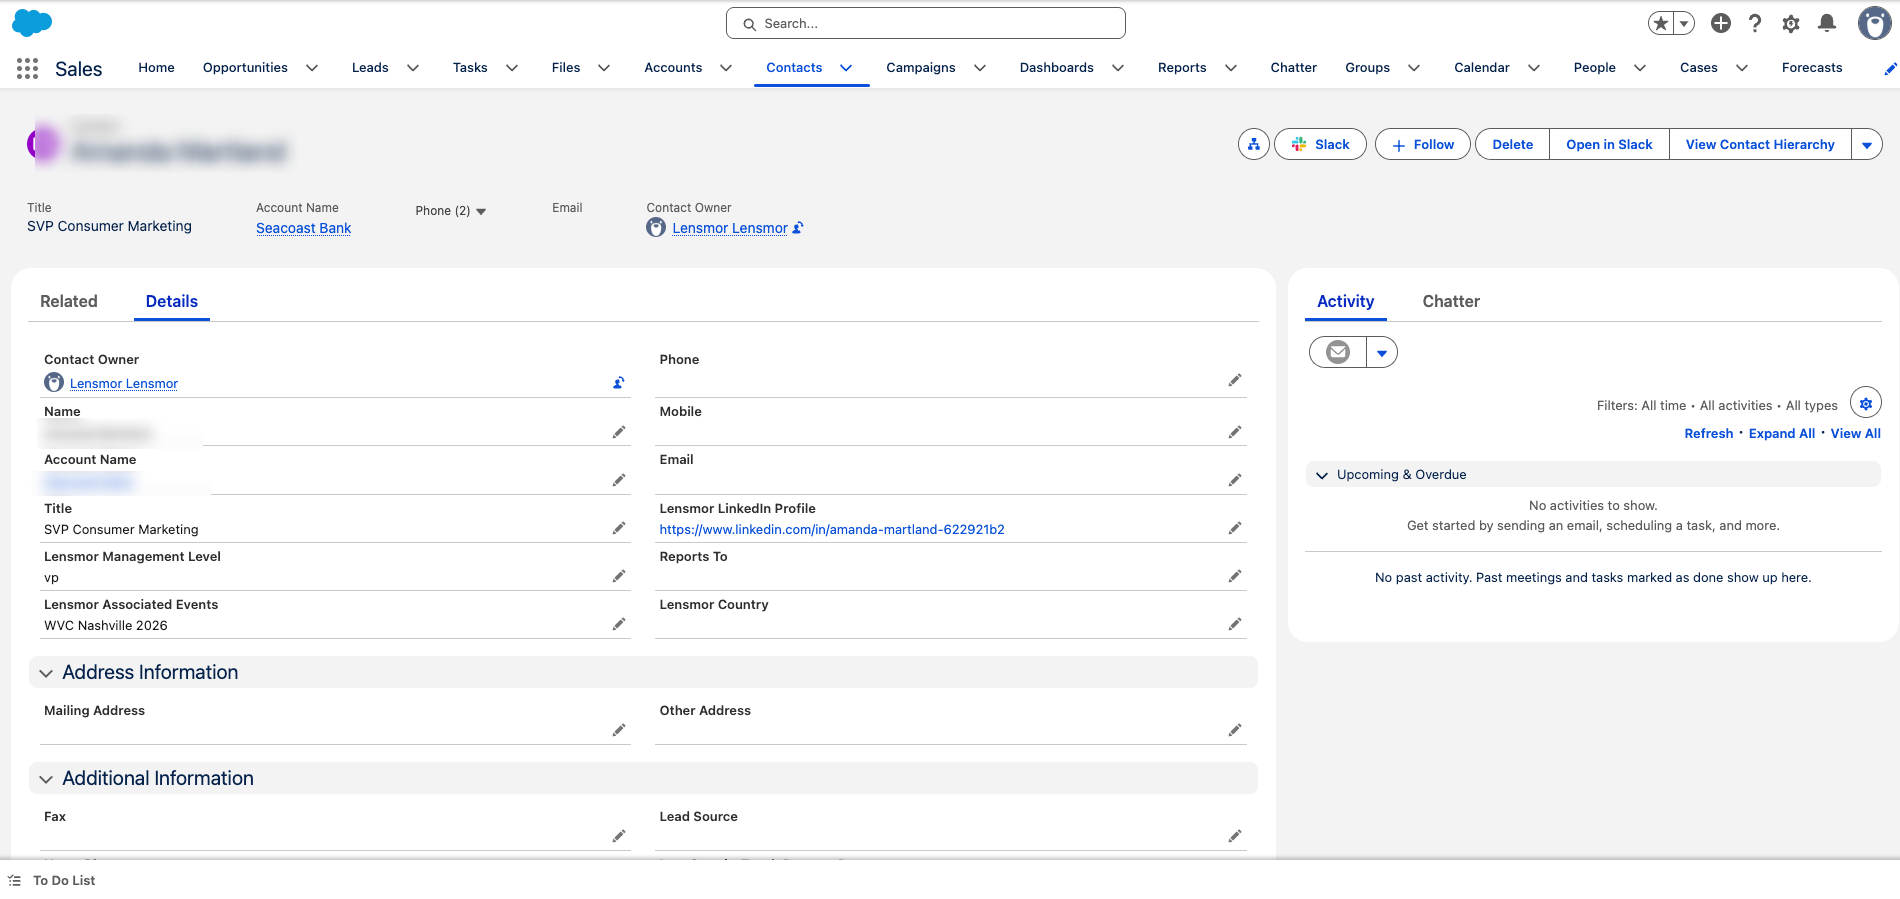
If the record page uses Dynamic Forms, add the fields through Edit Page in Lightning App Builder instead. If a field still does not appear, check the page layout assignment and field-level security for the viewing user. A Salesforce admin may be required.
Disconnect your account or change the CRM Workspace
Disconnect: Removes your personal Salesforce connection, synced snapshot, and sharing from Lensmor. It does not affect the Workspace Organization or other members' connections. Contacts already exported to Salesforce are not deleted.
Change CRM Workspace: Available only to Workspace owners and admins. It disconnects all members, clears synced CRM data and sharing in this Lensmor Workspace, and requires everyone to authorize again. Records in Salesforce are not deleted.
Troubleshooting
Wrong Organization: Reconnect and choose the Salesforce Organization shown in Lensmor. Ask a Workspace owner or admin before changing the CRM Workspace.
Sync needs attention: Confirm that your Salesforce user has API access and can read Accounts, Opportunities, and Users, then reconnect if required and run Sync now.
An Opportunity does not appear: Verify that it is associated with an Account, that the Account has a valid Website, and that the domain matches the Lensmor company.
No CRM columns or filters: The Salesforce sources visible to you currently have no matched Lensmor companies.
Export cannot create fields: Ask a Salesforce admin to grant the connected user permission to create the required custom fields, or have the admin complete the first export.
A contact fails because of duplicates: Merge or distinguish Salesforce Contacts that share the same email address, then export again.
Exported contact fields are missing: If a value is hidden or unavailable in Lensmor, exporting will not reveal or fill it automatically. If a Lensmor custom field exists in Salesforce but is absent from Contact or Account Details, ask an admin to add it to the assigned page layout (or Dynamic Forms) and check field-level security.
Using exported contacts: Check the destination Salesforce Organization and resulting records before using them in a live workflow.
Was this helpful?
Still need help? Share an idea